

Setting up a virtual environment in Python
Intro
Python knowns the concept of virtual envirnomnets. A virtual environment is a self-contained directory tree that contains a Python installation for a particular version of Python, plus a number of additional packages. This allows you to have multiple versions of Python installed on your machine and to install packages without affecting the rest of the system. In this post, I will show you how to set up a virtual environment in Python.
Why use virtual environments?
Why would you care about virtual environments? Well, there are several reasons to do so but I like to use them to keep production code running under a battle tested version of Python and specific versions of packages. When I want to introduce a new or unknown package I simply set up a new virtual environment and install the package. As updating or introducing a new package might have side effects which makes your code break you will be glad you don’t have to spend hours getting things back to work (trust me, I’ve been there). As we will see later on sharing your code on a platform like GitHub will also benefit from using virtual environments, especially when you are working in a team.
Installing Python
First install a version of Python. I am using version 3.11 at the moment of writing. You can [download Python from the official website][2]. After the installation, you can check if Python is installed by opening a command prompt and typing python --version. This should return the version of Python you installed. In my case it displays Python 3.11.6.
It is also possible to install multiple version of Python on your machine. You can use the py command to check which versions are installed. In the same command prompt, type py -0 to see the installed versions. For my local machine the output is:
-V:3.11 * Python 3.11 (64-bit)
-V:3.9 Python 3.9 (64-bit)
The * indicates the default version.
Setting up a virtual environment
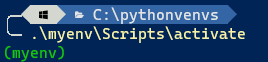
Now open a command prompt like Windows Terminal and create a new folder, for example C:\pythonvenvs. Navigate to this folder and type python -m venv myenv. This will create a new virtual environment in the folder myenv. To activate the virtual environment, navigate to the Scripts folder and type activate. Or from the root folder of the virtual environment, type .\myenv\Scripts\activate. You can check if the virtual environment is activated by checking the command prompt. The name of the virtual environment should be displayed in the prompt.
Note the activate command is in Windows Terminal with Powershell. If you are making use of a command prompt like DOS then use activate.bat instead.
Deactivating the virtual environment
To deactivate the virtual environment, simply type deactivate in the command prompt. This will deactivate the virtual environment and you will return to the global Python installation.
Using the virtual environment
Now that the virtual environment is activated, you can install packages without affecting the rest of the system. For example, you can install the requests package by typing pip install requests. This will install the requests package in the virtual environment. You can check the installed packages by typing pip list.
Usual packages to install are numpy, pandas and matplotlib. These packages are used for data manipulation and visualization. You can install these packages by typing pip install numpy pandas matplotlib. Note that if you run a pip list you will see the installed packages but likely also a bunch of other packages that got installed as dependencies. This is normal and is the result of the package manager installing the packages that are required by the packages you installed.
Leave a Comment